How to Cook Baby Back Ribs on a Grill
I'm Malcolm Reed, and if you've ever wanted to cook ribs on a grill, I'm about to show you exactly how to do it. Let's get to cooking!
Prepping the Ribs
I picked up a couple of slabs of baby back ribs from the grocery store—these come from the top part of the rib cage, right over the pork loin. First things first:
-
Remove the Membrane – Take the ribs out of the package, pat them dry, and use a paper towel to pull off that tough membrane from the backside. This helps the seasoning penetrate the meat better.
-
Trim Any Excess – Square up the ends and remove any unwanted fat.
Seasoning the Ribs

I'm keeping it simple and flavorful—the way ribs should be.
-
Apply a Binder – A light coat of yellow mustard helps the seasoning stick (don’t worry, you won’t taste it).
-
Base Layer of Flavor – A salt, pepper, and garlic (SPG) rub is a classic go-to. I’m using my AP rub for that perfect balance.
Barbecue Rub – Finish with a coat of your favorite BBQ rub for extra depth and color.
Flip the ribs over and repeat the process on the other side. Let them rest on the cutting board while the rub starts to pull some moisture out—this helps build that beautiful bark.
Setting Up the Grill
To cook ribs low and slow, you need to set up your grill for indirect cooking.
-
Preheat the Grill – Turn on the outside burners and adjust the heat to hold a steady 250°F.
-
Create Some Smoke – Since grills don’t naturally produce a lot of smoke, I made a simple smoke bomb:
-
Fill a small metal pan with wood chips.
-
Cover it with foil and poke a few holes in the top.
-
Place it near the heat source to create that classic smoky flavor.
Cooking the Ribs

Once the grill is holding steady at 250°F, it's time to cook!
-
Place the ribs directly on the grates, meat side up.
-
Let them go for about an hour, checking for color and flipping them as needed.
-
Around the 90-minute mark, my ribs are picking up some nice smoke color and the rub is setting up perfectly.
Wrapping for Tenderness
After about 2 hours, the ribs have the right color—now it's time to wrap.
How to Wrap the Ribs

-
Add more seasoning – A little extra rub for flavor.
-
Pour on some BBQ sauce – Today, I'm using a zero-sugar BBQ sauce to keep the sweetness in check.
-
Add moisture – A couple of tablespoons of apple juice in the foil keeps the ribs juicy.
-
Wrap tightly – Use two layers of foil to keep all that goodness locked in.
Place the wrapped ribs meat-side down back on the grill and let them cook for about an hour until they’re tender.
Testing for Tenderness
After an hour in the wrap, it’s time to check:
-
The bones have pulled back, and the ribs are sitting at about 204°F—perfectly tender!
-
Carefully unwrap them and get them ready for one last step.
Finishing the Ribs
-
Make a Rib Boat – Instead of placing the ribs directly back on the grill, I use folded aluminum foil to create a boat, keeping them easy to move.
-
Sauce and Set – Brush on some BBQ sauce and let them cook uncovered for about 15 minutes, just enough for the sauce to set and get tacky.
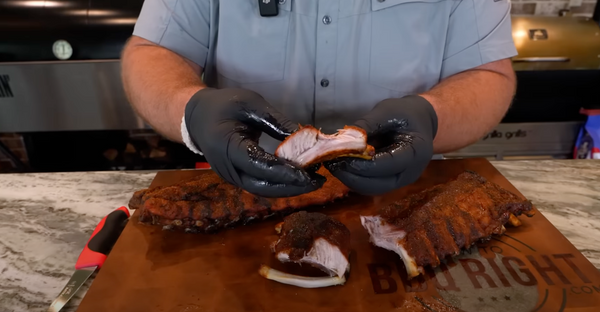
The Final Result
These baby back ribs came out perfect—tender, juicy, and full of smoky flavor, even on a standard grill!
If you’ve got a grill at home, now you know you can still make amazing ribs without a smoker.
Check out more at my Youtube Channel, HowToBBQRight.